Showing posts with label Linux. Show all posts

Tuesday, September 20, 2022

Setting Up Jenkins EC2 Linux Agent with Instance Storage


AWS EC2 Linux instance storage needs to be initialized first before it can be used. When setting up Jenkins EC2 Linux agent, we can do this with Init Script. The Init Script below formats and mounts instance storage if available and use it as Jenkins workspace and Docker data-root. This Init Script is failsafe. It means that it will not cause any errors if it turns out that the EC2 Linux instance does not have an instance storage.


set -x

export DEBIAN_FRONTEND=noninteractive

# https://engineering.deptagency.com/devops-fix-intermittent-yum-and-apt-errors-on-new-ec2
while [ ! -f  /var/lib/cloud/instance/boot-finished ]; do
    echo "Waiting for cloud-init to finish ..."
    sleep 2
done

apt-get -qq update

apt-get -qq -y install nvme-cli

mkdir -p /storage
EPHEMERAL_DISK=$(nvme list | grep 'Amazon EC2 NVMe Instance Storage' | awk '{ print $1 }')
test -n "$EPHEMERAL_DISK" && (mkfs -t ext4 "$EPHEMERAL_DISK" && mount "$EPHEMERAL_DISK" /storage) || true  # Use instance storage (if any) e.g. m5dn.large
lsblk

apt-get -qq -y install default-jre-headless git git-lfs

mkdir -p /storage/jenkins
chmod a+w /storage/jenkins

apt-get -qq -y install make

mkdir -p /etc/docker
mkdir -p /storage/docker
cat << EOF > /etc/docker/daemon.json
{
  "data-root": "/storage/docker"
}
EOF

curl -fsSL https://get.docker.com -o get-docker.sh
sh get-docker.sh

chgrp docker /usr/bin/docker
chmod g+s /usr/bin/docker

apt-get clean

Saturday, December 10, 2016

Kernel Patch - USB3 HDD Gets Mounted Again After Safely Remove


I have just found out that the Linux kernel patch for this issue has appeared on Linux Kernel Mailing List. I think it is supposed to be included in Linux kernel 4.10. Here is how I applied the patch on Debian 8 (Jessie).

Requirements

  1. Debian 8 (Jessie)
  2. Linux kernel source code 4.4.x LTS (Vanilla)
  3. Some basic knowledge on compiling Linux kernel source code

Instructions


1. Download Linux kernel source code.

$ wget "https://cdn.kernel.org/pub/linux/kernel/v4.x/linux-4.4.35.tar.xz"

2. Extract kernel source code.

$ tar xvf linux-4.4.35.tar.xz

3. Enter extracted kernel source code.

$ cd linux-4.4.35

4. Download USB3 HDD safely remove patch here and apply it.

$ patch -p1 -i fix-auto-remount-of-safely-removed-or-ejected-usb-3-devices-v3.patch

5. Copy kernel config from default kernel

$ cp /boot/config-3.16.0-4-686-pae .config
$ make olddefconfig

6. Adjust kernel config. Enable CONFIG_IP_NF_NAT and its sub-configs as modules (or else you will lose iptables NAT).

$ make menuconfig

7. Compile kernel.

$ make -j $(nproc) deb-pkg KDEB_PKGVERSION=$(make kernelversion)-1~local1

8. Install kernel. See notes below for any errors encountered.

$ sudo dpkg -i linux-image-4.4.35_4.4.35-1~local1_i386.deb linux-headers-4.4.35_4.4.35-1~local1_i386.deb

Notes


1. The open-vm-tools included in Debian Jessie cannot be compiled with kernel 4.4. It can be safely purged if you don't use it.

$ sudo apt-get purge open-vm-tools-dkms

2. If you use broadcom-sta-dkms, use the one from backports. The one from stable is too old for kernel 4.4.

$ sudo apt-get -t jessie-backports install broadcom-sta-dkms

3. To suppress error about pcspkr already registered on boot, blacklist snd-pcsp.

$ echo "blacklist snd-pcsp" > "/etc/modprobe.d/snd-pcsp-blacklist.conf"

4. If you are on Intel graphics and Xorg occasionally crash e.g. when you are playing video using VAAPI, add "i915.semaphores=1" to GRUB_CMDLINE_LINUX_DEFAULT in "/etc/default/grub" and run "sudo update-grub"

GRUB_CMDLINE_LINUX_DEFAULT="quiet i915.semaphores=1"

References

Sunday, March 13, 2016

FFmpeg - Transcoding Videos for Pioneer Head Unit AVH-P4450BT


Here are the basic steps to transcode videos for Pioneer Head Unit AVH-P4450BT using FFmpeg. The resulting videos should be playable on similar models such as AVH-P3450DVD, AVH-2450BT, and AVH-1450DVD. 

Pioneer Head Unit AVH-P4450BT


I am using Debian 8.3 and FFmpeg 7:2.8.3-1~bpo8+1 from jessie-backports. To get maximum video quality for the given bitrate, we will use two-pass encoding.

1. Since we have to use the same options for both encoding passes, we declare it first.

$ FFMPEG_OPTS="-c:v libxvid -b:v 1800k \
-vf scale='-2:min(ih,240)',setsar='1/1' -vtag DX50 \
-mbd rd -flags +mv4+aic -trellis 2 -cmp 2 -subcmp 2 -g 300 -bf 2 \
-c:a libmp3lame -q:a 2 -ac 2 \
-threads $(nproc)"

Explanation:

  • -c:v libxvid -b:v 1800k XVID 1800k.
  • -vf scale='-2:min(ih,240)',setsar='1/1' Scale the video size.
  • -vtag DX50 The resulting video won't be detected by the head unit without this.
  • -mbd rd -flags +mv4+aic -trellis 2 -cmp 2 -subcmp 2 -g 300 -bf 2 Some mumbo-jumbo to maximize video quality.
  • -c:a libmp3lame -q:a 2 -ac 2  LAME MP3 preset standard (good for music videos).
  • -threads $(nproc) Use all available CPU cores.

2. Run 1st pass.

$ ffmpeg -i "input.mp4" $FFMPEG_OPTS -pass 1 -passlogfile "ffmpeg2pass" -f null "/dev/null"

3. Run 2nd pass.

$ ffmpeg -i "input.mp4" $FFMPEG_OPTS -pass 2 -passlogfile "ffmpeg2pass" -f avi "output.avi"

That's it!

Wednesday, April 29, 2015

Updated Steps for Enabling BCM43142 Bluetooth on Debian 8 "Jessie" Stable

UPDATE 2015-05-15: Add a script to reload btusb after suspend to "install-btusb-bcm43142a0". 

Debian 8 "Jessie" has been released recently. A lot of things have changed since a year ago when it was still in Testing, especially on the kernel side. The good news is the support for loading firmware for Broadcom bluetooth has been committed to the mainline kernel. The bad news is for the vendor ID and the device ID for BCM43142 bluetooth (105b:e065) is still not there. Therefore, we still need to patch and recompile btusb in order to get it to work. The difference is the patch is much smaller now.

Preparation

1. Make sure you have the correct device. We are talking about 105b:e065 here.

$ lsusb | grep 105b:e065
Bus 003 Device 003: ID 105b:e065

2. Make sure you already have deb-src lines on your "/etc/apt/sources.list".

deb-src http://kartolo.sby.datautama.net.id/debian/ jessie main contrib non-free
deb-src http://kartolo.sby.datautama.net.id/debian/ jessie-updates main contrib non-free
deb-src http://security.debian.org/ jessie/updates main contrib non-free

3. Install "build-essential".

# apt-get install build-essential

4. Download and install "hex2hcd" from source.

$ wget "https://github.com/jessesung/hex2hcd/archive/master.zip"
$ unzip master.zip
$ cd hex2hcd-master
$ make
# cp hex2hcd /usr/local/bin

5. Get hex firmware for BC43412 from a Windows installation under "C:\Windows\System32\Drivers". The file name should be like "BCM43142A0_*.hex".

Recompiling

1. Download the bash script that I have written here and extract it.

$ tar xvf btusb-bcm43142a0-20150515.tar.gz

2. Put your hex firmware together with the script and rename it to "BCM43142A0.hex".

$ ls
BCM43142A0.hex  
btusb-bcm43142A0.patch  
install-btusb-bcm43142a0

3. Run the script. It will download the kernel source for the running kernel, patch btusb module, and install the firmware.

# ./install-btusb-bcm43142a0

IMPORTANT: Please verify the content of the script yourself first before running. I have only tested it on my installation of Debian 8 "Jessie" i386. I won't be responsible for any damage that it caused. Use at your own risk!

4. Your bluetooth should be running on the next boot. If not, try disabling and enabling it. See whether it runs.

If you have any questions, write in the comments below.

Sunday, March 15, 2015

USB HDD Gets Mounted Again After Safely Remove + Workaround

OBSOLETE: See updated info here.

This is actually an update for my previous post: Workaround for USB Drive is Mounted Again After "Safely Remove" on Debian Wheezy

As I have written before, I have had this issue since Debian 7 "Wheezy". When I perform safely remove, my USB HDD always gets mounted again. Then, I had to perform safely remove once more in order to remove my USB HDD for good.

At the time, I was using a laptop with an NVIDIA chipset and this issue did not occur on my friend's laptop which has an Intel chipset. However, I have been using this laptop since before Debian 7 "Wheezy" and it did not have this issue before. It turns out that this issue has not been solved until this post is written (Launchpad Bug 1239087 and Launchpad Bug 792085).

At that time, I started to look at the changes which has been made in linux kernel and udisks source code. Then I found the following lines in udisks /src/helpers/job-drive-detach.c:

      /* the remove file is pretty recent (commit as1297, Dec 2009) */
      if (sysfs_exists (udev_device_get_syspath (udevice_usb_device), "remove"))
        {
          g_printerr ("Disabling USB port for device: ");
          if (!sysfs_write (udev_device_get_syspath (udevice_usb_device), "remove", "1"))
            goto out;
          g_printerr ("OK\n");
        }

After some further digging, what I understand was that commit as1297 in linux kernel was intended to add sysfs "remove" attribute to USB devices in order to "emulate" Windows safely remove behavior. If my memory serves my right, this commit did not exist during Debian 6 "Squeeze" days and safely remove issue did not exist back then with my laptop.

With my limited C language understanding, I decided to remove the source code lines above and recompile udisks. After this, the safely remove works without the disk getting mounted again! I keep using this recompiled udisks during Debian 7 "Wheezy" days while waiting for a proper fix from the experts since it involves linux kernel.

Here comes the update.

A few months later, I had to buy a new laptop. This time I got a laptop which has an Intel chipset with a hope that i won't encounter that bug again. The laptop comes with Core i5 Haswell and has USB 3.0 ports. Since Debian 7 "Wheezy" does not support Haswell, I had to use Debian 8 "Jessie" which was still in testing. To my surprise, I encountered a similar bug but with USB 3.0 and it is worse. This time, no matter how many times I perform safely remove, the disk keeps getting mounted again. So, I thought I will remove the "offending" code again and recompile udisks. However, Debian 8 "Jessie" uses udisks2 which is an (incomplete) rewrite of udisks. Genius! I cannot apply my previous trick anymore.

I spend a few weeks to figure out what udisks does but udisks2 does not. I copy pasted source codes from udisks to udisks2 without any proper understanding. Then I modify it a bit so that my franken-udisks2 can be compiled. I can't explain it all here since it is quite long. At the end of it, safely remove works again for me on Debian 8 "Jessie"!

You can get the franken-udisks2 that I compiled for Debian 8 "Jessie" i386 below. For AMD64, you will have to compile it on your own (sorry, I am still maintaining i386 machines). Please note that while it works for mine, it may not work for your hardware. However, you can always try it AT YOUR OWN RISK! I AM NOT RESPONSIBLE FOR ANY DAMAGE CAUSED BY IT.

Franken-udisks2 (Debian 8 "Jessie" i386 build + debian source): Dropbox

This bug has existed since at least 2011. I am writing this post with a hope that it can help to solve it once and for all so that I can retire my franken-udisks2. I am willing to provide any information required.

Friday, August 22, 2014

One Way to Bypass ISP DNS Interception on Linux


There are multiple ways to bypass ISP DNS interception. If you are using Linux, one of the easiest way you can try is by redirecting all DNS lookups to port 53 from your PC to an "alternate" DNS port 5353 provided by OpenDNS. What you need is nothing but iptables.

Execute the following commands as root.

# iptables -t nat -A OUTPUT -p udp --dport 53 -j DNAT --to 208.67.222.222:5353
# iptables -t nat -A OUTPUT -p tcp --dport 53 -j DNAT --to 208.67.222.222:5353

The commands above will redirect all DNS lookup to port 53 from your PC to OpenDNS server on port 5353.

The advantages of using OpenDNS instead of your ISP DNS are:
  1. OpenDNS can be faster than your ISP DNS
  2. You can access websites blocked by your ISP DNS (yay!).
References:

Sunday, June 29, 2014

Epson Scanner Driver Build for Raspbian

So, what is this exactly?

This is actually a rebuild of iscan packages for Raspbian Wheezy.

What are iscan packages?

iscan packages are official packages provided by EPSON which contains linux driver and utility for their scanners and all-in-ones. They are provided in *.rpm, *.deb, and *.tar.gz format.

This build does not include EPSON Image Scan! utility!

Yes, EPSON Image Scan! utility has been disabled on this build. This is because it requires an EPSON proprietary library which is only available on i386 and AMD64.

How do I use my scanner then?

You can use XSane, Simple Scan, or any other SANE front-ends. If you are running headless, you can use scanimage (man scanimage).

How does it perform?

75 dpi is okay. 150 dpi is slow - but still acceptable. Above 150 dpi, it is very very slow.

Files

iscan_2.29.3-1local1_armhf.deb
iscan-data_1.28.0-2_all.deb
iscan_2.29.3-1local1.dsc
iscan_2.29.3-1local1.tar.gz


Monday, May 5, 2014

BCM43142 Bluetooth: Getting It to Work on Debian Jessie

UPDATE 2015-04-30: These steps are now OBSOLETE. The updated steps are here.
UPDATE 2014-05-08: Add info to keep bluetooth working after suspend/hibernate.


Overview

In this post, I will write the steps that I took to get BCM43142 bluetooth (105b:e065) working on Debian Jessie by porting patches from Ubuntu. Basically, there are two (2) things that need to be done.
  1. Patch and recompile btusb kernel module to support BCM43142 firmware loading.
  2. Get the actual hex firmware for BCM43142 from a Windows installation (yes, you read that right) and convert it to hcd format by using hex2hcd.

Patching and Recompiling btusb Kernel Module

  1. Download and unpack kernel source: $ apt-get source linux.
  2. Download patches for Ubuntu kernel git.
    • $ wget -O bcm43142-1.patch -c "http://kernel.ubuntu.com/git?p=ubuntu/ubuntu-trusty.git;a=patch;h=a0d51082d501dfa1238d591707472d19ce145334"
    • $ wget -O bcm43142-2.patch -c "http://kernel.ubuntu.com/git?p=ubuntu/ubuntu-trusty.git;a=patch;h=176cc999e91c322cbdf8d0812198d5c93377e4de"
    • $ wget -O bcm43142-3.patch -c "http://kernel.ubuntu.com/git?p=ubuntu/ubuntu-trusty.git;a=patch;h=d48ff3f7cec9528442bae8775312092098c99078"
    • $ wget -O bcm43142-4.patch -c "http://kernel.ubuntu.com/git?p=ubuntu/ubuntu-trusty.git;a=patch;h=e9ec28bf29304076f1f51a274cafa92c114e3417"
    • $ wget -O bcm43142-5.patch -c "http://kernel.ubuntu.com/git?p=ubuntu/ubuntu-trusty.git;a=patch;h=6e9c2318d11c3b144ef51e7bac5aa8dbf138565b"
    • $ wget -O bcm43142-6.patch -c "http://kernel.ubuntu.com/git?p=ubuntu/ubuntu-trusty.git;a=patch;h=679a33feea93e910a05614c8abe50a2e9aec7228"
  3. Switch to unpacked kernel source dir and apply the six (6) patches downloaded earlier in sequence.
    • $ cd linux-3.13.10 
    • $ patch -p1 < ../bcm43142-*.patch
  4. Still inside the unpacked kernel source dir, recompile btusb module and install it.
    • $ cp /lib/modules/$(uname -r)/build/Module.symvers ./
    • $ make oldconfig
    • $ make prepare
    • $ make modules_prepare
    • $ make modules SUBDIRS=drivers/bluetooth
    • # cp drivers/bluetooth/btusb.ko /lib/modules/$(uname -r)/kernel/drivers/bluetooth/btusb.ko
    • # depmod

Getting HEX Firmware for BCM43412 and Convert It to HCD Format

  1. Get hex firmware for BC43412 from a Windows installation under C:\Windows\System32\Drivers. The file name should be like BCM43142A0_*.hex.
  2. Download and compile hex2hcd from https://github.com/jessesung/hex2hcd/archive/master.zip.
    • $ wget "https://github.com/jessesung/hex2hcd/archive/master.zip"
    • $ unzip master.zip
    • $ cd hex2hcd-master
    • $ make
  3. Convert the hex firmware to hcd format and place it in /lib/firmware with the file name "fw-105b_e065.hcd" (since according to the lsusb, the hardware is 105b:e065).
    • # ./hex2hcd BCM43142A0_*.hex /lib/firmware/fw-105b_e065.hcd
After executing all the steps above, reboot the laptop. When the laptop started again, the bluetooth might still be blocked by rfkill. Unblock it using the following command.

# rfkill unblock bluetooth

The bluetooth should be working now.

To keep bluetooth working after suspend/hibernate, make btusb kernel module to be reloaded automatically every after suspend/hibernate. You can use the following command to do this.

# cat << EOF > /etc/pm/config.d/btusb
SUSPEND_MODULES="$SUSPEND_MODULES btusb"
EOF

Any feedback, please write it on the comments below.

Thursday, December 19, 2013

n2n: Simple VPN on Debian Wheezy

If you are looking for a way to connect two or more computers over the internet, there are tons of articles available on how to do this with OpenVPN. However, if you are looking for a way to achieve this with something other than OpenVPN, then you might want to try to use n2n

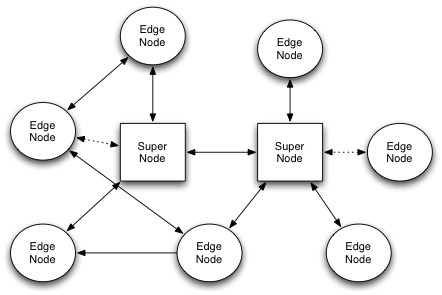
According to its website (http://www.ntop.org/products/n2n/), n2n is a layer-two peer-to-peer virtual private network (VPN) which allows users to exploit features typical of P2P applications at network instead of application level. An n2n VPN network consists of two (2) components.
  1. Edge nodes: the computers which you want to connect over the internet.
  2. A supernode: a computer which helps to connect edge nodes, especially if the edge nodes are connected to the internet behind NAT. This can be your own computer or someone else's computer (public supernode).
n2n VPN Network (taken from official n2n website)

For example, we want to connect these two computers.
  1. Alice's computer: located on Alice's home and connected to the internet behind a NAT.
  2. Bob's computer: located on Bob's home and also connected to the internet behind a NAT.
Both Alice and Bob have Debian Wheezy running on their computers and they have a typical home internet connection with no static IP.

The n2n VPN network we are going to build is as the following.
  1. The community name is casper and the N2N_KEY is bS3MU9quxD.
  2. The VPN IP assignments are:
    1. Alice's computer: 10.10.10.10
    2. Bob's computer: 10.10.10.11
  3. We are going to use public supernode provided by remoteqth.com (78.111.124.210:82).
The community name, N2N_KEY, and VPN IP assignments are arbitrary. You can set them to whatever which works for you.

Here is what needs to be done.
  1. Install n2n on both computers: run # apt-get install n2n
  2. Run n2n edge on each computer:
    1. On Alice's computer: run # N2N_KEY=bS3MU9quxD edge -d n2n0 -a 10.10.10.10 -c casper -u $(id -u nobody) -g $(id -g nobody) -f -l 78.111.124.210:82 -b
    2. On Bob's computer: run # N2N_KEY=bS3MU9quxD edge -d n2n0 -a 10.10.10.11 -c casper -u $(id -u nobody) -g $(id -g nobody) -f -l 78.111.124.210:82 -b
  3. Test the VPN connection:
    1. On Alice's computer: run $ ping 10.10.10.11
    2. On Bob's computer: run $ ping 10.10.10.10
  4. Done.
You can use the the above VPN connection for almost anything. Additionally, if you have avahi-daemon set up on both computers, you can access each computer by using its .local hostname e.g. alice.local or bob.local.

Saturday, October 26, 2013

Workaround for USB Drive is Mounted Again After "Safely Remove" on Debian Wheezy

Some of you might experience this issue whereby after performing "Safely Remove" on a USB disk, it gets mounted again after a few seconds and you have to perform "Safely Remove" once again. Some people found that only nvidia chipsets are affected by this issue.

The details of this issue can be found here:


My laptop which is affected by this issue is an Acer Aspire 4530.

Acer Aspire 4530

00:00.0 RAM memory: NVIDIA Corporation MCP78S [GeForce 8200] Memory Controller (rev a2)
00:01.0 ISA bridge: NVIDIA Corporation Device 075e (rev a2)
00:01.1 SMBus: NVIDIA Corporation MCP78S [GeForce 8200] SMBus (rev a1)
00:01.3 Co-processor: NVIDIA Corporation MCP78S [GeForce 8200] Co-Processor (rev a2)
00:01.4 RAM memory: NVIDIA Corporation MCP78S [GeForce 8200] Memory Controller (rev a1)
00:02.0 USB controller: NVIDIA Corporation MCP78S [GeForce 8200] OHCI USB 1.1 Controller (rev a1)
00:02.1 USB controller: NVIDIA Corporation MCP78S [GeForce 8200] EHCI USB 2.0 Controller (rev a1)
00:04.0 USB controller: NVIDIA Corporation MCP78S [GeForce 8200] OHCI USB 1.1 Controller (rev a1)
00:04.1 USB controller: NVIDIA Corporation MCP78S [GeForce 8200] EHCI USB 2.0 Controller (rev a1)
00:07.0 Audio device: NVIDIA Corporation MCP72XE/MCP72P/MCP78U/MCP78S High Definition Audio (rev a1)
00:08.0 PCI bridge: NVIDIA Corporation MCP78S [GeForce 8200] PCI Bridge (rev a1)
00:09.0 SATA controller: NVIDIA Corporation Device 0ad5 (rev a2)
00:0b.0 PCI bridge: NVIDIA Corporation MCP78S [GeForce 8200] PCI Express Bridge (rev a1)
00:13.0 PCI bridge: NVIDIA Corporation MCP78S [GeForce 8200] PCI Bridge (rev a1)
00:14.0 PCI bridge: NVIDIA Corporation MCP78S [GeForce 8200] PCI Bridge (rev a1)
00:15.0 PCI bridge: NVIDIA Corporation MCP78S [GeForce 8200] PCI Bridge (rev a1)
00:18.0 Host bridge: Advanced Micro Devices [AMD] Family 11h Processor HyperTransport Configuration (rev 40)
00:18.1 Host bridge: Advanced Micro Devices [AMD] Family 11h Processor Address Map
00:18.2 Host bridge: Advanced Micro Devices [AMD] Family 11h Processor DRAM Controller
00:18.3 Host bridge: Advanced Micro Devices [AMD] Family 11h Processor Miscellaneous Control
00:18.4 Host bridge: Advanced Micro Devices [AMD] Family 11h Processor Link Control
02:00.0 VGA compatible controller: NVIDIA Corporation C77 [GeForce 9100M G] (rev a2)
08:00.0 Ethernet controller: Broadcom Corporation NetXtreme BCM5764M Gigabit Ethernet PCIe (rev 10)
0b:00.0 Network controller: Atheros Communications Inc. AR928X Wireless Network Adapter (PCI-Express) (rev 01)

If my memory serves my right, this issue did not exist on the original Debian Squeeze release 6.0. However, it is introduced in one of Debian Squeeze release update 6.0.X. Until Debian Wheezy release 7.0, this issue has not been fixed yet.

After dissecting changes on Debian Squeeze release updates and a lot of trial and error, I managed to find that this issue occurs after the following linux kernel commit.

http://git.kernel.org/cgit/linux/kernel/git/torvalds/linux.git/commit/?id=253e05724f9230910344357b1142ad8642ff9f5a

So, it works like this. When "Safely Remove" is clicked, GNOME (or some other window manager) calls udisks. Udisks will then check whether the running linux kernel has "remove" attribute which was introduced on the linux kernel commit above. If "remove" attribute is found, udisks will then poke it to tell linux kernel to perform safely remove on the USB disk.

My conclusion is this issue might be caused by a bug in the linux kernel. However, since I am no expert, I am unable to debug or provide a fix for this. I can only think of some workarounds for this issue until it is fixed.
  1. Revert the above linux kernel commit and recompile the kernel, or
  2. Patch udisks so that it does not poke the "remove" attribute.
Since recompiling kernel will take a lot of time, I ended up choosing to patch udisks instead.

I have moved on to Jessie. You can get the patched udisks here (i386 build + source): Dropbox

Tuesday, October 1, 2013

D-Link DWM-156 on Debian Linux Wheezy with NetworkManager

In this post, I will attempt to explain how I managed to get D-Link DWM-156 working on Debian Linux Wheezy with NetworkManager (without wvdial).

NOTE: For those who want to skip the details and try this right away, you can find download links at the end of this post.

D-Link DWM-156 (Front)

D-Link DWM-156 (Back)

This broadband modem has a lot of variants. The one that I am using is the following.

dhanar10@aspire-4530:~$ lsusb | grep D-Link
Bus 002 Device 003: ID 07d1:7e11 D-Link System

This particular broadband modem does not work reliably out-of-the-box with NetworkManager. The symptoms are described nicely in this blog. This issue is due to ModemManager guesses the wrong ttyUSBx port.

After a lot of tinkering, I have managed to produce a patch and recompile ModemManager.

The patch consists of two (2) parts.

1. An additional udev rules to mark the wrong ttyUSBx ports.
# do not edit this file, it will be overwritten on update 
ACTION!="add|change", GOTO="mm_generic_port_blacklist_end" 
SUBSYSTEM!="tty", GOTO="mm_generic_port_blacklist_end"
SUBSYSTEMS=="usb", GOTO="mm_generic_port_blacklist_vendorcheck"
GOTO="mm_generic_port_blacklist_end"
 
LABEL="mm_generic_port_blacklist_vendorcheck"
SUBSYSTEMS=="usb", ATTRS{bInterfaceNumber}=="?*", ENV{.MM_USBIFNUM}="$attr{bInterfaceNumber}"
 
# D-Link DWM-156 HSUPA 3.75G USB Modem
ATTRS{idVendor}=="07d1", ATTRS{idProduct}=="7e11", ENV{.MM_USBIFNUM}=="00", ENV{ID_MM_PORT_IGNORE}="1"
ATTRS{idVendor}=="07d1", ATTRS{idProduct}=="7e11", ENV{.MM_USBIFNUM}=="01", ENV{ID_MM_PORT_IGNORE}="1"
LABEL="mm_generic_port_blacklist_end"
2. A logic which allows ModemManager to ignore the wrong ttyUSBx ports which has been marked by udev.
diff -Naur ModemManager-0.5.2.0.orig/plugins/mm-plugin-generic.c ModemManager-0.5.2.0/plugins/mm-plugin-generic.c
--- ModemManager-0.5.2.0.orig/plugins/mm-plugin-generic.c 2012-03-14 03:06:11.000000000 +0800
+++ ModemManager-0.5.2.0/plugins/mm-plugin-generic.c 2013-05-09 08:42:10.872596000 +0800
@@ -87,6 +87,10 @@
if (strcmp (g_udev_device_get_subsystem (port), "tty"))
return MM_PLUGIN_SUPPORTS_PORT_UNSUPPORTED;
+ if (g_udev_device_get_property_as_boolean (port, "ID_MM_PORT_IGNORE"))
+ return MM_PLUGIN_SUPPORTS_PORT_UNSUPPORTED;
+
+
if (mm_plugin_base_get_cached_port_capabilities (base, port, &cached)) {
level = get_level_for_capabilities (cached);
         if (level) {
The full patch can be found in the source package inside modemmanager_0.5.2.0-2obs1.debian.tar.gz under debian/patches/dlink-dwm-156.patch.

You can get the patched ModemManager here (yes, they are on OpenSUSE Build Service):
The patched ModemManager files are moved to Dropbox: here.